Honda CR-V Owners Club Forums banner
Status
Not open for further replies.

DPF issues, lights and high calculated PM

33K views 56 replies 6 participants last post by  UK-Kev  
#1 ·
Hi guys,
New member and first-time poster. Having received a lot of insight from this forum and a Civic forum these past few weeks, I wanted to share my recent experience and if possible, seek help and help others out.

A little bit of background on my DPF issue:
I have a 2015 1.6 i-DTEC - EX Sensing (160hp, 9 speed AT, 115k km - 30k km of which are mine, 100km daily return commute on 100km/h road).
A couple of weeks back I started encountering issues. One morning the car wouldn’t start. Engine cranked but never fired up. No warning lights or trouble codes present at first. However, after a while of trying to start the car, I managed to pull DTC error code: P065A. I believed this was possibly related to a low battery (likely my many attempts at starting the car causing it to drain). I hooked up a battery charger and left it overnight.
The following morning, I checked the battery was fully charged, cleared the error code and started the car successfully 1st attempt. I suspected the cold nights here (-23c the night before the trouble started) had caused some battery drain, so thought no more of it once the car was running again.

However, after running the usual 50km trip on a 100 km/h road into town, the ACC light illuminated on the dash telling me the adaptive cruise control was disabled. Once stopped, I tried scanning for error codes, but none were present.

On the return trip I got my first indication of the real problem, the dreaded DPF! light, the one with (!). I found this odd because from everything I have read, it seems more often the case that the DPF light without the (!) illuminates first, warning that a regen is needed and once the light with (!) illuminates, the car usually goes into limp mode. Mine never did and still hasn’t gone into limp mode.
My basic ELM scanner and app couldn’t retrieve much in the way of info or stats for DPF status other than P24A4 code (PM accumulation quantity excess) and a code that I cannot find much info on U3F00 (40)? I tried clearing both codes but the P24A4 remained present.

Searching online I came across a very helpful thread on a Civic forum with many people sharing similar experiences.
Long story short, I opted to buy one of the HDS HIM boxes from Aliexpress and setup the vintage hardware to run it!
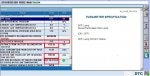
The stats pulled from the car show a calculated PM value of 31.5g and 1136km since the last regen.
I wondered if the ‘non starting’ a few weeks earlier was the first sign of a clogged DPF as that PM value is rather high? I am of the understanding that passive regens happen somewhere around 7-10g.

So, now to my present situation.
I have data suggesting a clogged DPF is the first issue at hand.
I can force a regeneration using the HDS HIM box but feel doing only that, would be in vain. I’m considering removing the DPF after the regeneration to perform a thorough clean and flush. The idea of running the forced regen first is to turn the clogged crap into ash, thus making the flush more effective??

The Civic forum thread has a few examples of guys having done the removal, and if the DPF location on the 1.6 Civic engine is the same as the 1.6 CR-V engine, then removal seems a relatively simple process.
After doing this I guess I will learn if there is another underlying cause for the DPF issue by monitoring the data regularly.

So, the questions I would like to ask are:
Firstly, am I getting ahead of myself and missing something, a possible underlying issue linked with or causing the failure to start or the jump straight to a DPF (!) light?
Does anyone know of any danger/damage that may or may not be caused to the engine by forcing a regeneration with a high calculated PM (31.5g)?
Has anyone here performed a removal of their DPF for cleaning? If so, is the process as simple as the Civic, done from the top of the engine?
Alternatively, although not my preferred choice given the high level of PM in my DPF, has anyone tried something like the ‘on car’ deep clean JLM 2 part clean/flush, which is blown into the DPF under pressure (5 bar)?

Thanks in advance for any help and advice.
 
Save
#3 ·
Hi and thank you for the welcome and speedy reply.
I did input that info, but I appreciate the post is LONG, so is easily missed.
"115k km - 30k km of which are mine, 100km daily return commute on 100km/h road".
Essentially, 115,000km on the clock, I have had it since 85,000km: I am not really sure on the type of usage prior to me owning it, long or short journeys. However, since owning it, I have done a daily commute of 100km (50km each way) at a steady speed of 90-100km/h. and occasional journeys of 500-600km every couple of months

Hope this helps
 
#4 ·
My bad, apologies for missing the info that you rightfully included. 👍

I am not really sure on the type of usage prior to me owning it, long or short journeys.
This is the killer - not knowing how those miles were accumulated and under what stresses or journies etc.

If Sweden doesnt have strict annual test rules (like the UK MOT), then I would delete the DPF and get it remapped.

Better fuel efficiency, no more clogged DPF. But you need to check your local laws.

You also need to factor in age too - the car is 7 years old. DPFs performance deteriorate just like any component. Replacing it may cure the (!) ills , but it will always come back.
 
#5 ·
The MOT over here is pretty strict unfortunately. I had considered the option of removal but thought better of it in the end.
I know ultimately a replacement DPF is needed at some stage due to deterioration, but was kind of in the, 'sod it' zone at the moment, wondering if a forced regen and clean is worth a shot before spending the eye watering sums on a new DPF. I haven't even got the courage to ask what Honda want for a replacement over here!

I have seen your valuable input on many topics here so maybe I could tap into your superior knowledge.
The thing I am most hesitant about if doing a forced regen, is that high calculated PM of 31.5g or am I over thinking it. Although it's high, is it too high for a forced regen?
I guess I could always take it out and flush it through first, the reinstall it and run the regen?
 
#8 ·
I feel that this will be the case eventually, given the age, but was hoping to eek it out a little longer.
I might proceed with the removal and flush over the weekend if I have some free time. I will report back any findings.

Hello @DC2,

Let’s start off with your codes: -

P065A = A low output from the alternator and may result in a no start, electrical accessories may not function correctly and drain the battery completely.

P24A4 = Blocked DPF

U3F00 = CAN error Code which means advertising no code and will be assigned a designation at a later date. Suggest you talk to a good auto electrician on this point as it could be related to your P065A code.
Thank you UK-Kev
I will see if I can locate a good auto electrician, that stuff is wizardry to me o_O:D
The P065A code only appeared that one time, and was able to be cleared with my basic ELM tool and phone app at the time. It hasn't reappeared... As yet!
The P24A4 is self explanatory I guess, and backed up by the high calculated PM readings I get from the HDS HIM box.

As I mentioned above to TheDarkKnight. I might just give the removal/flush/clean a shot first. If it works and I can run a PM reset and force a regen, I may just eek out some more life from it.
It might even help me discover if there is an underlying issue as to why the PM figures are high.
I'd hate to spend out on a new DPF only to find there is an underlying issue already clogging up the new one!
 
  • Like
Reactions: UK-Kev
Save
#7 ·
Hello @DC2,

Let’s start off with your codes: -

P065A = A low output from the alternator and may result in a no start, electrical accessories may not function correctly and drain the battery completely.

P24A4 = Blocked DPF

U3F00 = CAN error Code which means advertising no code and will be assigned a designation at a later date. Suggest you talk to a good auto electrician on this point as it could be related to your P065A code.
 
#9 ·
Update:
I haven’t had the opportunity to remove the DPF to clean and flush it as I had planned. A combination of crappy weather and lack of time has prevented this so far.
However, I carried out some checks to the DPF differential pressure sensor which UK-Kev had advised others to perform in another thread. Checking for damaged wires, poor connections, cracked hoses, pipe blockages (I used an airline set to 1 bar). No obvious issues found.

I then decided I would try a forced regen via the HDS box I purchased. In doing so, some light has been shed on possible causes for the DPF warning I am experiencing.

So, I hooked up the box and ran the HDS software.
- Scanned for DTC codes - P24A4 being the only code present.
  • Cleared the DTC codes
  • Selected to run forced regen
  • Check through the ’Criteria’ check list prior to forcing the regen – All criteria met, with 1 exception. HDS determined I hadn’t performed a long enough trip for the overdue regen to be carried out, although the ’Short Trip’ judgement was passed (long trips only).
  • Therefore, I set the 9AT to ’manual’ mode and went on a 100km (approx. 60 mile) trip, uninterrupted speed between 90-120km keeping the RPM consistently between 2750-3750 RPM (It pained me to hear the engine like this!).
  • Returned home and hooked up the HDS box, ran the regen program only to find the report still stated I hadn’t performed a long enough trip for the overdue regen to be carried out!
  • I opened the sensor measurements and found the calculated PM had now raised to around 38g
  • I decided to try forcing the regen regardless and went through the onscreen preparation instructions. (Engine up to temp, bonnet open, air-con on, headlights on etc).
  • Regen failed to start. HDS listed possible causes, one of which I suspected I would encounter. Calculated PM reading too high for the regen to proceed.
  • Opened the appropriate setting menu and reset the calculated PM reading back to zero.
  • Once again, prepared the vehicle for the regen.
  • The regen started, engine steadily building RPM and temp.
  • After approximately 4-5 minutes, the engine RPM dropped gradually and the regen was cancelled by the HDS software, accompanied by a message that some parameters were not within range. There was a list of parameters that could cause the regen to cancel itself.

I was a little puzzled as to what to look for next so decided to run a full vehicle DTC check (I can’t remember if this was under the ’Health Check’ option or not). Anyhow, several permanent DTC codes were listed in the report (I assume these were historic issues?).
One of which being U0401-68.

* I wondered if this was linked to P0181 (Fuel Temperature Sensor out of range), which had illuminated the PGM-FI light on my dashboard the winter before last. At the time, the car was taken to a local garage, and they reset the code saying it likely wasn’t an issue, that it was something to do with my engine block heater and the cold winter morning causing a false alert??
The light never came back and I thought no more of it.

P0181 - FUEL TEMPERATURE/ENGINE COOLANT TEMPERATURE (ECT) SENSOR/INTAKE AIR TEMPERATURE (IAT) SENSOR INCORRECT VOLTAGE CORRELATION
POSSIBLE FAILURE - Fuel Temperature Sensor


Anyhow, I ran a check on all car sensors and noted this:
FUEL TEMPERATURE SENSOR ..……….. 28.0C
ESTIMATED FUEL TEMPERATURE …… -25.0C (Minus 25c)

That (minus) -25c reading clearly seems to be an issue.
Fuel temperature, ECT & IAT were all listed as parameters that could cause a regen to halt.

When I search for fuel temperature sensor location, I seem to get lots of results for ECT sensor.
I’m aware an ECT sensor is the Engine Coolant Temperature sensor.

Can anyone advise where the fuel temperature sensor is located. Is it part of the fuel pump assembly by the fuel tank?
Additionally, could there be a link between a potentially faulty fuel temperature sensor and the DPF! light I am encountering?

Any thoughts, guidance, would be greatly appreciated.
(I've attached a copy of the sensor summary and DTC health check for reference)
 

Attachments

#10 · (Edited)
Hello @DC2,

Regarding the codes that you mention: -

P24A4 Blocked DPF

P0181 fuel temperature sensor range / performance – As far as I am aware Honda have not fitted a fuel temperature sensor for a number of years – Try giving your local Honda dealer a call and tell them you have this code and see if they are willing to give you any information. Personally I think the code has a false description and I would be inclined to clean the MAP sensor.

U0401-68 This code is in fact U0401 and has occurred 68 times which is a little worrying. The code itself relates to invalid data received from the ECM / PCM. You need to check all the pins and connectors at the ECM / PCM modules. Have you only tried doing a forced regeneration with your HIM service tool? In the past I have read about spurious service tools doing this sort of thing, so my advice is try another service tool capable of doing regens on Honda’s.

I have note had chance to look at your data yet, but will try later on today.
 
#11 ·
@UK-Kev Thank you for that information. I had no idea U0401-68 indicated 68 occurrences of the same fault, that's very interesting to know, and I agree, also a little concerning.
So far I have only tried the forced regen via the HIM tool, yes. I'll see if I can loan another device somewhere, or failing that, get a garage to try to run a regen.

First I will follow your advice on the MAP sensor and maybe run some checks on the ECT sensor and AIT sensor while I am at it, as they are also referenced in the P0181 code. (I may have been jumping ahead by reading the words 'fuel temp sensor' in the code description along with noticing the odd fuel temp readings in the sensor summary).

I'll read some more into the ECM / PCM checks too. Not something I have looked at before but I am sure there is plenty of helpful info on this forum and elsewhere to guide me through.

I appreciate the help, thank you.🙏
 
Save
#12 ·
Hello @DC2,

Well spent a few hours looking at the pdf sheets you posted – Okay on the first sheet (01 All DTC Test Certification) It states you have a VSA actuator malfunction. And a couple more malfunctions which to be honest I cannot get my head round what I am reading.

Just moving on a little if you have a malfunction as described above then your service tool will not let you proceed with a regen.

Now the strange part (see highlighted document 02 Sensor Summary EDIT) This states that the DPF is not blocked, however the calculated PM is 24.9g and the system should be shutting down above 16g – Please see attached pdf document DPF From Owner’s Manual.

I will be honest I have no idea were to start on this problem and if this was a Honda garage that conducted this test, they should have raised a technical support ticket with Honda UK/Europe.

I cannot prove it, but I believe you may have a partially corrupted ECM/PCU – See if you can clear the listed malfunctions and then run a full diagnostic test yourself and see if any fault codes come up. If you have more than one service tool, try and doing a cross reference.
 

Attachments

#13 ·
#14 ·
Hi again @UK-Kev
Sorry, I should have mentioned regarding the DPF statistics in the Sensor summary. They were stats taken after I had reset the DPF calculated PM measurements. This was required in order to run a regen.

Below I have attached a screenshot which shows the DPF stats prior to the PM reset. It still shows 'Not Blocked* but the 'Distance since last regen' is more informative, as is the calculated PM value. As you state, at16g and above the system should be shutting down, and this is one of the things that has puzzled me about my issue. I never received the warning without the (!). The first and only DPF warning was the more severe one, but the car has never entered into limp mode at any point.

I believe you are on the right track in thinking the issue does not rest solely with the DPF. The dash warning may just be a bit of a red herring. I will read the links you posted and follow any information I find within, and I'll post back once I have tried clearing the other DTC codes to advise of my findings.

Tomorrow I have to take a long drive North of here and will be passing a Honda dealer, I have printed off my DTC summary in preparation and will try to catch one of the Technicians to pick their brains.

I should clarify. " and if this was a Honda garage that conducted this test, they should have raised a technical support ticket with Honda UK/Europe.".
It was actually me who ran this test using the HDS/HIM box I purchased online some weeks ago. I was surprised by the Honda branding at the top of the print off too. All rather official for an Aliexpress bargain 😳😏

Again, thank you for your valuable advice 🙏
 

Attachments

  • Like
Reactions: UK-Kev
Save
#15 ·
Hi DC2,

Wow I never knew these cloned service tools actually produced Honda logo branded reports, that would certainly cause problems in the motor trade aftersales market….. Tee Hee.

Thanks for the update – See what your local Honda has to say about this issue and let us all know.
 
#16 ·
Hi @UK-Kev
Well, the trip past my nearest Honda service spot was one step short of pointless:
Firstly the service desk checked for anything similar to that US service bulletin on the UK/EU database, but found nothing. Fair enough.

I asked if I could chat to one of the technicians for a moment. I showed him the list of codes and briefly explained my issue, he was either clueless or uninterested in giving any advice. He simply said, a low battery can cause a lot of that and later said maybe try updating the software on the ECM. Maybe he had Friday fever and had already clocked off in his mind 😏

Unfortunately I have a lot going on this weekend, but I'd really like to try and check out a number of the pointers you have raised.
I would like to check the the pins on the connector for signs of water ingress, as referred to in that service bulletin.

I will also start researching how to perform a software update, and decide if it is within my abilities to successfully run one! - Do you think this could rectify a partially corrupt ECM/PCU?
I do recall seeing an option in the HDS menu for resetting the ECM/PCU.

I actually need to buy a 12v battery for running a diesel heater in my garage. In order to help eliminate any battery related issues with these DTC codes, I might just order a new battery for the CRV, and repurpose the existing one for the diesel heater.

I will update any findings. 👍
 
#17 ·
Bear in mind when you perform tasks with the OBD software to run them with car engine on on idle (in well ventilated area) or plug an battery charger/ conditioner 5A+ to avoid killing your installed battery. You don't want any unpleasant surprises during software updates or ECU resets

Sent from my BBD100-1 using Tapatalk
 
#19 ·
Thanks @otto33 I appreciate the tip. I will check what my Noco charger puts out. I have a feeling its only about 3.5A 👍
Have a look on the Honda MARIS website for your software download, but please note you have to pay to use this system.

Do I think your partially corrupt ECM/PCM will update, it may fix the problems but not sure it will update - Have a try and see what happens.

So, you received the standard answer from your local Honda dealer it must be the battery they are about as good as a chocolate tea pot.

The Honda Maris website link >>> Welcome - Landing page - MARIS Pay and Go

Have a look in the bulletin section first to see for your self if any TSB relating to this issue.

If I think of anything else, I will let you know.
Thanks @UK-Kev, some nice light bedtime reading 😁
I guess if I can find the information I need, and download the appropriate software updates, the 30 Euro for 1 days access is well worth it. I think it costs around that just to pull onto a Honda forecourt nowadays! 🤣

Do either of you guys happen to know if the original software is needed before performing an ECM/PCM reset, or is that software resident in the ECM/PCM memory?
 
  • Like
Reactions: otto33
Save
#18 ·
Have a look on the Honda MARIS website for your software download, but please note you have to pay to use this system.

Do I think your partially corrupt ECM/PCM will update, it may fix the problems but not sure it will update - Have a try and see what happens.

So, you received the standard answer from your local Honda dealer it must be the battery they are about as good as a chocolate tea pot.

The Honda Maris website link >>> Welcome - Landing page - MARIS Pay and Go

Have a look in the bulletin section first to see for your self if any TSB relating to this issue.

If I think of anything else, I will let you know.
 
#20 · (Edited)
@DC2
Been a very long time since I did this over ten years, but to answer your question yes. I also remember having to save the original software and then overwriting with the new software – NOTE once you have programmed the new software into the ECM you cannot go backwards.

Have a read of all the Maris FAQ's before you pay your money and ask them any question, they will steer you in the right direction.

Other’s things to note with the Maris system - Because this system is used by all the HONDA dealers across UK/Europe the Maris system runs very slow between 8.00 and 18.00 Hr’s so if you adjust your times after this period, you will get more value for your money. Oh, and BTW if you get any good information don’t forget to share…. Thanks.

New question:- What was the total DPF calculated PM measurements before you reset it?
 
#21 ·
@DC2
Been a very long time since I did this over ten years, but to answer your question yes. I also remember having to save the original software and then overwriting with the new software – NOTE once you have programmed the new software into the ECM you cannot go backwards.

Have a read of all the Maris FAQ's before you pay your money and ask them any question, they will steer you in the right direct.

Other’s things to note with the Maris system - Because this system is used by all the HONDA dealers across UK/Europe the Maris system runs very slow between 8.00 and 18.00 Hr’s so if you adjust your times after this period, you will get more value for your money. Oh, and BTW if you get any good information don’t forget to share…. Thanks.

New question:- What was the total DPF calculated PM measurements before you reset it?
@UK-Kev
Sounds very much like the general procedure for a firmware upgrade in the IT/hardware sphere. I'll do plenty of reading beforehand and exhaust the resources on the Maris system. Thanks for the tips.

Regarding the DPF calculated PM measurements before the reset:
Prior to the first attempt at regen it was 24.5g in the sensor summary, and 31.5g during the pre-regen check.
However, due to the pre-regen check stating I hadn't met the requirements for the overdue regen to take place, I subsequently went on that 100km long, high speed, high RPM drive.
It didn't assist in instigating a regen, so at the next pre-regen check the calculated PM had increased to 38g

I'll be sure to share all and everything I learn from Maris, and the reset or upgrade procedure.

Thank you
 
#22 ·
@DC2,
Thanks for the feedback - Late yesterday I was going over all your notes and remembered that I had not asked you about the total PM value before you reset it. There is a little unknown fact which I came across from my own notes saved over the years and I must state that your DPF may be at it’s point of no return and will require a new DPF unit - When a DPF reaches a pre- determined particulate matter (PM) fill level (around 40%), the ECU will activate the regeneration process, which can inject up to eight times more fuel per stroke – a rate which is needed to produce temperatures in excess of 550°C dry or 450°C with the passive system (fuel additive Eolys), so that it can incinerate the PM that has been captured within the DPF.

I have attached the complete pdf document for you to have a read.
 

Attachments

#23 ·
@UK-Kev
I really appreciate the help you are giving me here. Thank you.
What you have mentioned makes complete sense. Ultimately, I know these DPF units are of limited life, and if I have the car for any length of time I will inevitably need to purchase a replacement.
It is a strong possibility that will be the case here.

I will still go through a number of the other points you have identified, sensors, ECM, connectors etc. I feel that would be the prudent thing to do, even if I were to buy a new DPF today.
I'm hoping to at least get an hour or 2 tomorrow to run some checks on the sensors, and maybe get under the car to check that connector for signs of water ingress. I'll run a few more sensor and diagnostic checks with the HDS unit, but I don't plan to try any more forced regens, at least not at this stage.
A process of elimination👍

Incidentally, I found this stashed in my favourites yesterday evening. It's a Civic document, found on the Civinfo forum I believe, but I'm sure it applies to the CRV in many instances.
https://alexey-bass.github.io/honda-hds-help/Help.html

One for the repository 😉
 
#24 ·
Hi all, apologies for the delayed update. So much else currently going on, diagnostics had to take a back seat until I had time to run through a number of checks in one sitting.

Anyhow, I have been quite busy on the car and here are my findings:
- Firstly, I followed the advice of @UK-Kev in other posts and performed a visual inspection of the pressure sensor pipes and used compressed air at 2 bar to blow through the pipes of the DPF differential pressure sensor and the pressure sensor itself. Nothing out of the ordinary noticed when doing so.

- Next, I performed a visual inspection under the vehicle for signs of ingress around the wiring harness referred to in one of @UK-Kev previous posts in this topic. No obvious signs of ingress.

- Next, I set about removing the DPF from the vehicle in order to flush it out with large volumes of water.
I don’t recommend trying this on the 150 BHP 1.6 iDTEC Earth Dreams Engine if anyone is considering it because it is an utter nightmare!

I couldn’t find any guides online from anyone else having done this, other than guys over on CivInfo having done it on their Civics. I thought to myself that it must be a very similar process… Oh how wrong I was! The biggest difference being an exhaust gas (?) return pipe from the base of the DPF that comes back up into the engine bay and into a unit, which is bolted to the engine block, behind the DPF. This prevents the DPF from being lifted out once unbolted top and bottom. It requires a whole lot more dismantling in the engine bay, which I had no intention of getting into.

Instead, I fabricated 2 thin plate steel blanking plates to block off the connection between the DPF and Turbo at the top, and another where the DPF connects to the exhaust pipes at the bottom. I bolted these tightly in place to the Turbo/DPF juncture and the Exhaust/DPF juncture respectively. I used a simple rubber gasket on each to ensure water tightness.

With the Turbo section, and the lower exhaust section safely blanked off, and the DPF disconnected but still in the engine bay, I flushed a tonne of water into the DPF via the Lambda Sensor hole.
To my surprise, the water running out from the bottom was as crystal clear as the water going in. I left the water running for around 10 minutes. No debris flushed out, whatsoever.

Therefore, either my DPF is clean inside (Which is what I suspected due to my journey type- Long 100km daily commute at 100km/h), or it is so gunked up and oily/greasy, the water washed straight over everything inside.

Regardless, I reassembled everything and ran the engine at around 2000 rpm for a long while until there was no longer any water vapour or residue exiting the exhaust, then left it running another 10 mins or so.

I decided to blow through the DPF differential pressure sensor pipes again, this time at 5 bar. I chose to do this because I had also purchased the JLM DPF 2 part cleaning solution (Pro version – video link below for those that are interested) that is blown into the DPF through DPF pressure sensor front pipe at 5 bar. My logic was that if 5 bar was going to be blown through if I decided to use this cleaning solution, then I may as well try the same pressure with the air gun.
How to use JLM's DPF Cleaning Kit. A walkthrough on a Honda CRV with some very helpful tech tips - YouTube

- I then proceeded to run further checks on the DPF differential pressure sensor using my HDS box, multimeter and exhaust/fuel pressure gauge.

I have attached photos and videos of my findings. In essence:
The voltage readings on the signal wire to the DPF differential pressure sensor are consistent. Idle at 1.09v and increasing marginally with increased RPM’s
The Kpa readings when using a pressure gauge on the front and rear pipes are consistent (I checked 3 times and compared with the readings obtained via the HDS box), but I have no benchmark with which to compare them. I am unsure if the readings are high or not.

FRONT PIPE @ IDLE – Circa 2 Kpa
FRONT PIPE @ 3000 RPM – Circa 12.5 Kpa

REAR PIPE @ IDLE – Almost no register on the gauge
REAR PIPE @ 3000 RPM – Circa 2 Kpa

The HDS box shows idle Kpa around 1.4 Kpa and @ 3000 RPM around 11+ Kpa

  • Do these seem high?
  • Is the difference between the front/rear pipes too large a difference?
  • If so, does this indicate a blockage?

- Other noteworthy points.
The Lambda sensor was rather sooted up upon removal. I am assuming this is the result of the increased fuel usage that has been occurring since my DPF problems started.
Ever since the problem first occurred, the smell of the exhaust fumes changed and had a very distinctive smell. I would describe it almost a little ammonia like in odour. I have read of others describing odd ‘Sweet’ smelling diesel fumes.
This smell persisted after water flushing the DPF
After reassembling the DPF and blowing through the pressure sensor pipes a 2nd time, I noticed the odd odour seems to have disappeared. Coincidence or could this indicate something?
The pressure readings and voltages were taken AFTER the 2nd pipe clearing.
I haven’t used the JLM DPF cleaning solutions yet. I don’t want to confuse the fault finding process.

With the odd odour seeming to have gone, I’m wondering if it is worth resetting the calculated PM figures in the HDS menus, clearing the DTC code and attempting another forced regen?

Any thoughts on the above would be greatly appreciated.

N.B. I am holding off on running an ECM software update for the moment, as my HDS box is a clone. I’m searching various forums for other people’s experience on running an ECM update on a cloned box. I haven’t found anything yet. The dangers are obvious, I guess.

 
Save
#25 · (Edited)
@DC2
Hello,
My, my, you have been busy, I know what you mean about getting the DPF out on the 1.6 i-dtec engine bay. I have not had the opportunity to do a 1.6 DPF yet, but I am told the secret is with raising the engine by 20mm by loosening the engine mounts, But if you use the JLM fluid no need to remove the DPF.

I like the fact that you intend on using the JLM two stage cleaning system (this is the one I would recommend) – BIG TIP >>> Watch the video again and the guy will tell you after the second lot of cleaning fluid has been through the system and after road test he had 4mBar back pressure reading (approx). You can use the link below to convert from kpa to mbar (check it yourself) and you will find that your DPF is still blocked.

BTW All be it that the DPF pipes does look clean in the photo you figures say the DPF is blocked – If you can get your hands on a digital manometer, you would get a far greater accuracy and correlation of the parameters – This is one of the reasons for me asking you to check the differential pressure sensor again.


Link >>> Convert kPa to mbar - Conversion of Measurement Units

Further to the above and I know you stated that you have done this already, but please troubleshoot a DPF differential pressure sensor again so you can eliminate it.

When troubleshooting engine sensors, it is recommended to look for any signs of visible damage first. Check all connections, starting with the sensor electrical connector, and look for any damage such as cracking or melting. Any damaged wires will need to be replaced.

Next, inspect the hoses connected to the sensor. Again, look for any damage such as cracking or melting. If the hoses are damaged, they will need to be replaced and most likely rerouted, so they are not damaged the same way again. If the hoses look to be in good physical condition, check for any blockage or clogs. If clogged, the hoses will need to be cleared or replaced.

If everything passes physical inspection, you can test the DPF differential pressure sensor using a multimeter set to 20V and a pressure gauge.

  1. With the battery on and engine off, connect the multimeter ground to the negative battery terminal and run a quick plausibility by checking the voltage of the battery. It should be around 12.6 volts.
  2. Consult the manufacturer’s service manual to identify the signal, ground, and 5-volt reference and back-probe the wires.
  3. Turn the ignition switch on without starting the engine. The multimeter should (typically) display a voltage between 4.5 to 5 volts for the 5-volt reference, a steady 0 volts for the ground wire, and between 0.5 and 4.5 volts for the signal wire. Consult OEM factory service information for the exact specs on your vehicle.
  4. Start the engine with the signal wire back probed.
  5. Rev the engine and notice if there is a change in voltage. If not, move on to test the connecting hoses with a pressure gauge.
  6. With the engine still running, remove the hoses from the sensor.
  7. Using a pressure gauge, measure the pressure of both hoses. For sufficient accuracy, use an exhaust back pressure gauge that can read / measures up to 15 PSI.
  8. Check the signal voltage again. The voltage should read a number between the pressure values of the hoses. For example, if the rear hose reads half PSI and the front hose reads 1 PSI, the voltage of the signal wire should read somewhere in the middle around .8 volts.
If your voltage differs greatly or the pressure values do not match the voltage reading, the DPF differential pressure sensor is faulty and will need to be replaced.

Note: If you do have to replace the DPF pressure sensor then you will need to get it Calibrate by your sensor, Honda distributor can do this for you because most aftermarket scanners / service tools are not capable of doing this – If you have use of the old Honda HIM service tool you will be able to complete this activity in the sensor learning section.
 
#26 ·
@UK-Kev
Thanks again. Now you mention it I do recall the guy mentioning mBar pressures in the video, but failed to follow through a conversion, I guess I was paying more attention to the process for applying the 2 part solution. Now having followed your link and done the conversion 😲 ....my pressures are very high!

So potentially, I am looking at a clogged DPF and a dicky DPF differential pressure sensor. Neither are too drastic in the grand scheme of things.

I will troubleshoot the sensor again, as I was concerned about the difference in front and rear pipe pressures, and the voltage readings from the signal line to the sensor, as stated in this part of your guide above:
"The voltage should read a number between the pressure values of the hoses. For example, if the rear hose reads half PSI and the front hose reads 1 PSI, the voltage of the signal wire should read somewhere in the middle around .8 volts.
If your voltage differs greatly or the pressure values do not match the voltage reading, the DPF differential pressure sensor is faulty and will need to be replaced. "


Luckily I have the clone HDS box and have seen the new sensor learning options.

With regards to the JLM 2 stage cleaning fluids. I didn't want to spend out the 220 GBP being asked for the application gun. I had figured I could fashion something out of one of my atomiser guns (attached image) but it seems that any restriction around the end of the nozzle results in the fluid in the reservoir tank just bubbling around and not being pulled out by the air vacuum. I played around with several setups using water as the test liquid, but same end result.
I also tried messing with a sand blasting gun which fared no better.
Any ideas of an alternative application method? I would prefer to stick to the 5 bar pressure as that is something that the JLM literature make a point of.
I thought of something like those hand pumped weed killer spray bottles, but I have no way of regulating the 5 bar pressure on one of those 🤔
Image


I'll keep the topic updated with my learnings and finding in the hope of assisting others down the line.
 
  • Like
Reactions: UK-Kev
Save
#27 ·
@DC2,

Wish I still had my old HDS tool but alas it went the way of the dodo….. Lol

Wow love that idea of using a weed killer bottle sprayer, or even an old atomiser air gun, at the end of the day all you are trying to, is get the JLM fluid vaporised around the DPF box to loosen and remove the heavy particles.

It will be interesting to see your results from retesting the differential pressure sensor again because I am still a little puzzled by how clean your exhaust down is! have you been using a lot of diesel? could the DPF has been trying to a regen and failed and this may be why you are getting a blocked DPF status and prove the differential pressure sensor may be the main cause of the problem.

FYI by the way I picked up a digital manometer of that WWW online website for £30 quid and has more than paid for itself and I only had for less than 12 months.
 
#29 ·
@UK-Kev
I think you are right. I have been puzzling away the past couple of days and my focus is now on the differential pressure sensor AND a blockage in the pipes or DPF itself.

In answer to your question, yes diesel consumption increased significantly since the error occurred.
Prior to that, there had been a general drop in overall fuel economy.
It's hard to know the current diesel consumption as I haven't been on a significant road test since I learned I cannot force a regen and the passive regens are not happening. It's been parked up whilst I use the trusty old 2003 CR-V 2.0 Petrol for daily duties!

I have heeded your advice and looked on Amazon.se and found a few digital manometers around the price you paid.
Additionally, I am heading into town today to pick up one of these:
Rust protection spray - Biltema.se
For under 15 Euro, I think this will do the trick with administering the JLM 2 part solution into the DPF.
Whilst in town, I will try local stores for a Digi Manometer, else I have to wait until at least Friday next week for a Amazon.se delivery... None of that 'same day' or 'next day' luxury here I am afraid!!
Either way I will be buying one as I feel it will be used a lot going forwards, even if it's just through paranoia! 😁

So, over the course of this weekend, I plan to do a deeper clean on the DPF differential pressure sensor pipes and the pressure sensor itself. Followed by measuring the values again (with or without a digital manometer). And I hope to clean the DPF using the JLM 2 part, if the application gun I buy today is up to the task.

I'll be sure to report my findings.

2 questions:
1. Can I use a cleaning agent, maybe brake cleaner, to squirt through the pressure sensor pipes and the pressure sensor itself, to facilitate a deeper clean? I'll use a soft nylon bristle pipe cleaning brush (The type used to clean paint spray guns) and compressed air too.

2. Thinking ahead, if the pressure sensor is found to be faulty or highly suspect. Do you recommend going to the main stealer and getting a new part from there, or another aftermarket item such as Delphi etc?
 
Save
#30 ·
@DC2

1/ You can spray cleaning fluid through the pipes, I would use both JLM cleaning liquids, BUT please note you cannot spray through the sensor itself because you might damage the transducer and you should note there is no actual flow passage – All the differential pressure sensor does is measure the actual differential pressures between the two pipes from the DPF and sends the signals to the ECU.

2/ Regarding your second question does your differential pressure sensor look like picture one or picture two – see attached.
Picture 2 is the Delphi one and is more reliable than the other Malaysian one. (imop)

If you do change the differential pressure sensor, please remember to do the new sensor learning process and if possible, please take photos and notes for other folks reading this blog and the fact that I no longer have my Honda service tool and cannot take any photos.…. Thanks.
 

Attachments

#31 ·
@UK-Kev
I have the sensor in Picture 1 - Malaysian part.
So I presume it has to be the same part as a replacement? They look very different in terms of fixing points and pipe positioning.

During the full DPF clean I'll be sure to use both parts of the JLM liquid.
When I mentioned cleaning with brake cleaner or similar cleaner, I meant just when blowing through the pipes and running pressure checks. It was my intention to do this again before doing the JLM DPF clean.
I'll be sure to avoid any liquids coming in contact with the sensor itself 👍

Absolutely, I'll take notes and pictures to upload for others to reference in future.
Hopefully, I'll be able to provide an update after the weekend.🤞
 
  • Like
Reactions: UK-Kev
Save
Status
Not open for further replies.
You have insufficient privileges to reply here.