Honda CR-V Owners Club Forums banner
Status
Not open for further replies.

How do I remove just the clear plastic instrument cluster panel "cover" behind the steering wheel? 2019 CR-V Touring

19K views 12 replies 9 participants last post by  vw2honda  
#1 ·
I have searched on YouTube and etc. My present plastic cover is scratched and I would like to replace it. Does anyone have a video or photos and the tools I will need to remove the cover and reinstall a new cover? Thanks!
 

Attachments

#5 ·
I agree with SnakeCharmer, try polishing the plastic first. You might check with the dealer to see how much they will charge, it takes less than an hour to do and may not cost much to replace. If you finally decide to replace the plastic screen yourself, the process is this basically this. First remove the bezel surrounding the instrument cluster, it snaps out. You will see the screws holding the instrument cluster. Remove the cluster, disconnect the electrical cable and the knob used to dim the display. The plastic screen is actually part of the cluster but snaps off. If the new screen doesn't come with a protective film, cover the screen with masking tape to prevent scratching it during installation.
Look on YouTube for removal of the cluster for a 4th gen CRV. The procedure is the same.

If you remove the bezel you will find it much easier to polish the plastic. Warning when removing the bezel go easy, there are two plastic tabs on the bottom of the screen that fit in the bezel. You need to pull the bezel straight back to prevent breaking the tabs off.
 

Attachments

#6 ·
Acutally we talked about this 6 months ago here. the thread went on for a page or two,

You are under warranty, and not sure if it will be covered, between you and the dealer. No other site member here made a video for youtube, you havet o do a little more then just grabbing off the actual benzel, on my older car its grab-n-go. not the crv
good luck, be the first to do one, post one and show one
 
Save
#7 ·
I think everyone tries to help here. And I agree with you. But the one thing for sure, the dealer was not too helpful as they want your business for the bucks.. It is like a mystery game to finding out the correct formula for removing it without doing more damage to other parts, etc. Not to labor the issue, I had it replaced once, under warrantee when I first bought the vehicle. The cover scratches very easily and is most noticeable when the sun hits it at the right angle.
 
#8 ·
Yes here is a thread

its been talked about, if the dealer is of no help under warranty, the General office is the next step. maybe its time gorilla glass is made for these clusters.
 
Save
#13 ·
Yes here is a thread

its been talked about, if the dealer is of no help under warranty, the General office is the next step. maybe its time gorilla glass is made for these clusters.
Yes here is a thread

its been talked about, if the dealer is of no help under warranty, the General office is the next step. maybe its time gorilla glass is made for these clusters.
Thank you!! It certainly gives me more of an idea on the procedure.
 
#10 ·
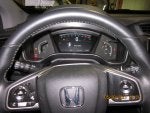
Owners who have reported replacing the plastic sneeze guard on the instrument panel report mixed results. So.. I would suggest that be your last resort, not your first resort. Scratched installing, lint on the inside surface after installing, you name it.. it's probably happened.

Instead.. first see if you can gently buff out any scratches... using a proper plastic polish and scratch removal kit made for soft acrylics like this. I suggest this kit, as I have used it with success on a number of soft acrylic surfaces. As long as you follow the instructions and the scratches are not deep... it should do the trick.

Now... failing that.. there are threads in this forum that have discussed the how-to in the past, so try the search feature in the forum, or another member may have a link to the discussions handy and post it here. Note: I see fishycomics has linked it for you already.

I try never to actually touch the plastic screen, instead I use canned air to blow any dust or lint off of it, and if I do see some residue.. then I pull out that little polishing kit I linked up above
 
Status
Not open for further replies.
You have insufficient privileges to reply here.