
Honda Part Number: 08P32-TLA-110
Official Honda Picture:
![]()
My install (over black leather interior):
![]()
View from trunk:
![]()
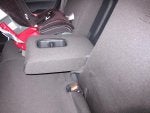
With Arm Rest Down:
![]()
I purchased these seat covers for my CR-V in order to help minimize the impact of any toddler-related cleanup in the backseat. I only have one car seat now, but will need another one in a few months so I figured I would get a cover for the whole back seat.
The covers arrived folded in a plain box with no documentation or instructions included. You can read the installation instructions at the College Hills Honda site. Note that anywhere the instructions say "fastener" it is referring to a velcro strip. The cover material feels like a wet suit and is relatively thin. The CR-V logo is embossed on the driver and passenger seat backs. No other branding is present.
You receive 8 separate covers:
The top parts of the covers envelop the entire seat front and back, so anything muddy in the cargo area would not affect the back of the seats. There is a small area on the side of the seat (visible in my install picture by the door edge) that is not covered.
The bottom covers envelop the entire leather surface of the seats and attach, via velcro, under the seat (you can feel the carpet the velcro attaches to if you run your fingers between the seats). Each bottom cover has multiple flaps that you push between the top and bottom seat to fasten on the back of the top cover (again via velcro).
Installation was not difficult, but it was not easy either. Fishing all the straps through the back of the seat was tricky because you need to have the seat half-way down while lifting the spring loaded cargo cover.
In addition, I couldn't get the "tight" install I desired on the bottom covers because I couldn't pull the bottom flaps any tighter. They attach to a thin strip of velcro on the back of the top cover and can't be pulled any further. This leads to the small loops of uncovered seat visible in my install picture between the top and bottom covers (one visible on the driver side, two on the passenger side and one in the middle).
I may be able to get a better fit with future installation attempts, but for now this appears to be the best I could do. It would be nice if you attached everything while the seat back was down and the raising of the seat could pull the covers taut.
The covers do not impede the raising and lowering of the seats to extend the cargo area. The top covers have cut outs for the latch that handles the seat release and they also have holes in the back to allow access to the rear tether. The top covers have cutouts for the child seat latch slits across the rear seat backs.
The headrest covers fit perfectly, so they must be put on straight or the seams will be crooked.
So, you get a durable material that does not add a lot of "bulk" to the seat and all of the cutouts line up exactly with the CR-V's rear seat. The rear seat buckles, latches, tethers, and armrest all remain functional. Also, for those of you who have purchased the Fender Emblem Accent Trim the embossed CR-V logo provides similar experience that will let your passengers know that, yes, you are in a CR-V.
I'll post updates if I notice any wear and tear issues once I get the car seat installed and tested.
Official Honda Picture:

My install (over black leather interior):

View from trunk:

With Arm Rest Down:
I purchased these seat covers for my CR-V in order to help minimize the impact of any toddler-related cleanup in the backseat. I only have one car seat now, but will need another one in a few months so I figured I would get a cover for the whole back seat.
The covers arrived folded in a plain box with no documentation or instructions included. You can read the installation instructions at the College Hills Honda site. Note that anywhere the instructions say "fastener" it is referring to a velcro strip. The cover material feels like a wet suit and is relatively thin. The CR-V logo is embossed on the driver and passenger seat backs. No other branding is present.
You receive 8 separate covers:
- Passenger Bottom
- Passenger Top
- Passenger Headrest
- Middle and Driver Top
- Middle and Driver Bottom
- Middle Headrest
- Driver Headrest
- Middle Arm Rest
The top parts of the covers envelop the entire seat front and back, so anything muddy in the cargo area would not affect the back of the seats. There is a small area on the side of the seat (visible in my install picture by the door edge) that is not covered.
The bottom covers envelop the entire leather surface of the seats and attach, via velcro, under the seat (you can feel the carpet the velcro attaches to if you run your fingers between the seats). Each bottom cover has multiple flaps that you push between the top and bottom seat to fasten on the back of the top cover (again via velcro).
Installation was not difficult, but it was not easy either. Fishing all the straps through the back of the seat was tricky because you need to have the seat half-way down while lifting the spring loaded cargo cover.
In addition, I couldn't get the "tight" install I desired on the bottom covers because I couldn't pull the bottom flaps any tighter. They attach to a thin strip of velcro on the back of the top cover and can't be pulled any further. This leads to the small loops of uncovered seat visible in my install picture between the top and bottom covers (one visible on the driver side, two on the passenger side and one in the middle).
I may be able to get a better fit with future installation attempts, but for now this appears to be the best I could do. It would be nice if you attached everything while the seat back was down and the raising of the seat could pull the covers taut.
The covers do not impede the raising and lowering of the seats to extend the cargo area. The top covers have cut outs for the latch that handles the seat release and they also have holes in the back to allow access to the rear tether. The top covers have cutouts for the child seat latch slits across the rear seat backs.
The headrest covers fit perfectly, so they must be put on straight or the seams will be crooked.
So, you get a durable material that does not add a lot of "bulk" to the seat and all of the cutouts line up exactly with the CR-V's rear seat. The rear seat buckles, latches, tethers, and armrest all remain functional. Also, for those of you who have purchased the Fender Emblem Accent Trim the embossed CR-V logo provides similar experience that will let your passengers know that, yes, you are in a CR-V.
I'll post updates if I notice any wear and tear issues once I get the car seat installed and tested.

") If you were to say this isn't a great product or had other advice I guess I would reconsider the ivory vs. black interior before I complete the final paperwork and take delivery. Thanks!
If you were to say this isn't a great product or had other advice I guess I would reconsider the ivory vs. black interior before I complete the final paperwork and take delivery. Thanks!

