Honda CR-V Owners Club Forums banner

PB Blaster on brake nuts?

2.6K views 36 replies 9 participants last post by  bradleydavidgood777  
#1 ·
In preparation to remove the brake caliper and bracket, and the rotor, is it OK to spray PB Blaster on all those nuts and the rotor retention screws days ahead of time, if I intend on driving the car again before doing the work?
Or will it mess with my brake pads or operation of the brakes?

Thanks!
 
#5 ·
When putting together back I suggest that you put Anti seize on the bolts especially the bolts or screws that hold the rotors to prevent seizing and ease of removal.
Torque everything to specs to be sure.
You can also spray some fluid film on the face of the wheel hub bearing where the rotor sits to facilitate removal in the future.

I hope this helps.
 
#6 ·
Yes, great idea, because if for some reason this engine or transmission dies anytime in the next few years, I'm the one who is going to be taking any bushings and control arms with bushings and struts out of this car for another 2006 that I would buy to replace it.

I have an almost full bottle of Permatex anti seize lubricant staged.

Thanks!
 
#10 · (Edited)
Iirc, these have the pesky little screw that holds the rotors on. I would definitely hit those with penetrant oil. Also be prepared for that Philips head to strip with the use of a standard screwdriver. Many use a manual impact driver on it (and then throw the bolt/screw in the trash).
The other caliper bolts will not need any penetrant but use a 6 point socket to prevent any stripping on the bolt head.
Any smaller bolts like a brake hose bracket or wheel sensor bolt would benefit from penetrant as they can be a bear after rusting in place.
Good luck. And do one at a time so you can reference the other if needed.

Edit-Oh, and don't put any anti-sieze on any caliper bolts. If anything, put a little low level lock tight on them. Put anti-sieze on that rotor screw if you plan to reuse it.
 
#11 ·
Yes, I was just watching a video about that and I found my manual impact driver that I have. So you don't need that screw to be reinstalled is what you are saying.

You say hit that with PB Blaster, but won't that work its way out to the rotor and pads because I'm going to be driving it after application and before the suspension overhaul.

I got all of your other points noted, thank you!
 
#14 ·
#15 ·
Let’s not forget these are JIS screws and that’s how Phillips screwdrivers strip them so quickly

i just did a pad change on mine, found the OEM Honda pads were used last service by the original owner, man I love a single owner old car. Anyway, I didnt pull the rotors just yet, I will of course be doing the brakes again in the future, thats when I will rip it all out and replace rubber supply lines, fully inspect the calipers as well as replenish all the brake parts. I’d caution you to mark the upper and lower pad retention springs, Honda wants me to beleive by making a separate part number for upper and lower, that they are different! I’ve done many a brake job on many cars and such and had not seen any difference in what I took off, but I couldve gotten a high dosage of brake cleaner in my eye too.
i also have the permatex copper color antiseize, used a decent amount of it on the wheel mount surface to the hub so the Houston rust won’t make it hard to get the wheel off in the future. Found the caliper slides a bit gunky, so they too got the yellow slider grease aka SIL-GLYDE brake lubricant which I’ve done a few brake jobs with and still have a good amount left in the toothpaste sized tube, so another good buy

honda does sell EACH rubber piece for the front calipers in case you feel it’s time they are changed, boots and slide o rings like any rubber can disintegrate or degrade over time, mine were good this time around, I’ll stock up on them for the full refresh I will do in the future

that pesky screw for the rotor is an assembly line thing if memory serves

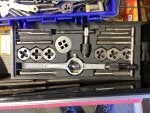
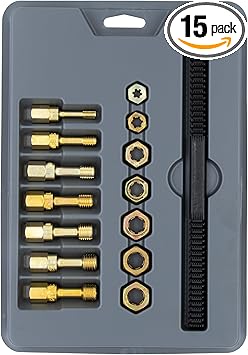
the last thing I’d mention is a proper METRIC tap and die set, I’ve had to recently add to my ancient set in order to have both common pitch threads, but it’s worth it as I tend to trace and chase threads when I’m taking things apart to ensure they don’t crust up worse than they already are when I pull them apart. On a recent power steering hose replacement, I found one of the two pump bolts to be on the verge of rust and corrosion that could’ve paid me back by snapping off inside the pump😱😱😱
I chase the threads on both those bolts and feel I can sleep better at night🤣🤣
 
#18 ·
That’s looking pretty inclusieve, I had bought a Sears set ages ago and then recently for some smaller diameter(read 10 and 8mm socket head sized) bolts I bought a smaller set from Lowe’s, Irwin brand I believe. They are serving me well, the photo of the Sears set will show you how many it had and I don’t use 50% of the set as the Honda points of regular maintenance barely stray from a few sizes of bolts, but there are a couple pitch sizes they bounce back and forth from which is so fun to find out at the wrong time
 

Attachments

#19 · (Edited)
The tap and die sets can get you out of trouble with buggered up threads. As an alternative, there are also “thread chasers”. Thread chasers have edges made for pushing threads back into place as compared to a tap or die which is supposed to cut new threads or shave off bent threads. Practically, you can use and tap/die as a thread chaser, but not the other way around. a company called Lang makes most of the thread chasers in the USA. They are relabeled under multiple brand names such as Lang, Kastar, Craftsman, and Snap-on.

I’ll also second the JIS compatible screwdrivers. The JIS screws are found all over the place and if you buggered up the head of a screw on a Honda, it’s likely that you used a traditional Phillips screwdriver on a JIS screw. I only have three JIS drivers, the +1, +2 and +3 sizes.
 
#20 ·
I have a thread chaser, looks like a square file with a ton of different sized teeth on it, recently I saw they offer a METRIC version, but in all honesty,I lIke my taps and dies to do the work, of course on something large and not necessarily easily removed, a chaser is a valuable tool, read cv axle shaft and the like
 
#32 ·
if you’re working with JIS screws, use either a Japanese screwdriver brand or a screwdriver that satisfies ISO 8764-1 or DIN 5260-PH specs. Using a traditional Phillips screwdriver on a JIS screw is often going to strip out the head of the screw. The modern Japanese/ISO 8764-1/DIN 5260-PH screwdrivers are made to fit both Phillips and JIS screws.

The JIS screws I’ve seen on my 03 CRV … Brake rotors, Door latches, IACV of the throttle body, factory radio come to mind. I’m sure there are many more. Look for that little dot +. next to the screw head, denoting a JIS Screw.

That Posidriv screw head I usually find on IKEA furniture. I ruined many IKEA screws before I knew the difference.
 
#36 · (Edited)
They should be JIS +3.

FWIW, if you use a hand/hammer style impact driver, many people say you can get away with using a Phillips style bit. The downward force generated by the hand impact can prevent the cam out that strips the JIS screw heads. (My hand impact happens to have JIS bits)


yes, posidriv and JIS and Phillips are 3 different things. They are three types of screw heads that look similar if you aren’t paying attention. There are more + shaped screw heads out there, just not as commonly seen.